Canon camera settings for shooting is the main and first step that should be performed by every novice photographer after choosing and purchasing a camera. There is only one thing to remember, well-chosen camera settings will help you make a big step in the field of professional photography.
There are several basic actions or rules that you must do in order for your photos to please you on any trip, how to do it and what camera settings need to be changed, we will tell you on our travel website travel-picture.ru.
For beginners in professional photography and the first setup of the camera, we recommend reading the instructions, most of the answers, of course, can be found in the instructions for use, for advanced amateur photographers, we advise you not to waste time and register on specialized forums, here you will find wider camera settings for shooting and more professional tips for artistic photography.
Accumulator charging
The first step in setting up a DSLR or a conventional camera, you will need to be sure to charge the battery. All batteries have the property of being discharged, so we remember once and for all - full operation of the rechargeable battery on the camera requires a full charge-discharge cycle... Let us explain, after buying a camera, first of all we fully charge the battery to 100%, then we discharge it to about 5%, this cycle must be repeated several times.
The charge-discharge cycle of the battery is necessary so that your battery has a strong supply of energy and an increased charge capacity for the full operation of the camera, which it loses in the process of rest while waiting for its new owner in the store.
The second setting of the camera - formatting the memory card
The next setting on the camera is to format the memory card. Formatting the memory card deletes all factory information and cleans up the memory on the card. If you format a memory card through a computer, then do not forget to set in the formatting settings FAT32, but not NTFS as many do.
Formatting via the camera is done using the camera settings menu, the Canon camera settings for formatting are indicated with a wrench.
Choosing image quality and size
There are many different things in the settings of the camera responsible for the quality and the image. For those photography lovers who just take pictures, the quality is enough “S1"With an image size of 2592 × 1728 or"S2”With dimensions of 1920 × 1280, these picture settings are quite decent for wallpaper on a widescreen monitor.
For those who print advertising banners 3X6 meters, camera settings are needed for shooting a little more essential, here you need to set the quality “L”, The size of such a parameter will already be 5184 × 3456 pixels.
Do not forget to add quality as well. RAW (for processing a photo in the program Photoshop). By setting additional RAW quality and S quality for ordinary photography in the camera settings, you are killing two birds with one stone. First, you take pictures of the landscape you like and if you need to correct the white balance or other image settings, then RAW will do it in Photoshop without loss of quality.
There is one drawback when setting two image settings in the camera at the same time. Most cheap SLR cameras have a very weak processor, so when you set two image parameters, the camera starts to slow down and freeze. Therefore, we do not recommend setting RAW image quality unnecessarily.
Also, to get the right photo and frame the frame, you can enable the grid mode, if you don't remember or don't know why you need a grid, then read our article on the 2/3 rule.
For Nikon, the camera settings are similar, only the names are different. The maximum image quality is called here Large. Then you will need to set the optimal image quality. Highest JPEG or Fine JPEG or Extra Fine JPEG.
The next camera setting for shooting is white balance
An important camera setup is white balance... Setting the white balance in automatic mode (AWB) gives excellent results for photographers new to this business, so we set it to automatic and forget about the white balance in the camera settings.
For the more curious, we recommend trying two white balance modes - fluorescent or incandescent. These two modes give an interesting white balance effect. For professionals in photography, the white balance is adjusted already in manual settings depending on the situation and is adjusted only after a few test photos.
Camera setup - exposure metering
There are several types of exposure in nature: matrix (evaluative, multi-zone), center-weighted (average), partial and point... For beginners who do not like to rack their brains, set the matrix mode in the camera settings and proceed to the next step.

For the advanced, let's explain a little about the differences between exposure modes. In the matrix mode, the frame is divided into several small areas, the illumination is estimated in each area, then all areas are summed up and the average exposure value is displayed, which is displayed over the entire frame.
Matrix mode is ideal for portraits and even backlit subjects.
The center-weighted setting mode of the camera speaks for itself, here the center point is estimated and the exposure is distributed over the entire frame, this mode is suitable for shooting an object in the center of the frame.
Partial metering is used to make the center of the subject stand out as much as possible, highlighting the subject you want to photograph, losing the background of the frame.
Well, the last mode for setting up a Canon camera with exposure metering is spot exposure metering. This mode of camera settings is loved by professional photographers to gain complete control over exposure metering.
Here, metering data is read only for a relatively small portion of the scene. In order to take full advantage of all modes, we recommend trying out all exposure metering on the same subject, then you will see the differences and get more professional photos.

Focus is another basic Canon camera setup
There are three focusing modes of the camera - these are ONESHOT, AL SERVO, AL FOCUS.
For those who like shooting moving objects, we definitely recommend using the AL SERVO mode, by focusing a moving object, you can photograph it in motion while your finger is on the shutter release. You will be able to hold this object until the moment when the perfect frame is selected.
You can use the rest of the modes in all sorts of situations, they do not play a special role, their only application is professional photography, but we also did not meet professionals in their field who are soaring with the settings of these modes, set the normal mode and forgot.
Setting up a Canon camera with a choice of AF points
Everything is simple here, in most cameras there is a setting that tells the device which autofocus points to use, this camera setting is ideal for beginners.

The camera, according to its focusing technology, always first of all selects the object in the center and focuses on it.In order not to miss the object you need, press the shutter button so many times until the camera shows a red dot on the object you need.

If this is a long time for you, use manual focus mode, it will be much faster and come in handy in the dark when the camera cannot find the focus point.
Camera setup - shooting mode
In the camera settings, you can find two shooting modes - single (Single) and continuous shooting (Continious). The single shooting mode is good because if you even forget to remove your finger from the shutter button, the camera will take one shot. In continuous shooting mode, when you press your finger for a long time, the camera takes several frames per second, a good option for capturing the movement of the subject.
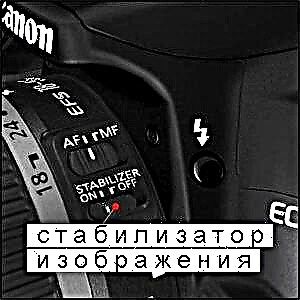
Image stabilizer
A useful camera setup for both beginners and professionals alike, especially if you are shooting video or long focus photography. But do not forget that the activated image stabilization mode on the lens (if there is a stabilizer on the lens) consumes the battery a little faster, it is better to turn it off unnecessarily. In other cases of photographing objects at night or at slow shutter speeds, a tripod will help you.

Setting up the camera for shooting - color space
There are two types of color space in the camera settings: sRGB and Adobe RGB... We recommend choosing Adobe RGB, this mode has more colors in its supply, this range is suitable in most cases of shooting objects.
Camera setup - picture style
By default, your Canon DSLR should be set to “standard”, Which is suitable for beginners in almost all situations of life, but you can also experiment, for example, set the“ landscape ”mode, this mode enhances blues and greens. Mode "Portrait”Makes the image settings of the subject more fuzzy and softens the colors.
Most photographers set their own mode settings by editing existing modes. For example, on our camera we have slightly changed the “Landscape” mode, we have increased the sharpness, contrast and color scheme. If you have a high-quality lens, then you don't have to mess with these settings, especially since you can always edit the image in Photoshop.
These are all the basic Canon camera settings that we wanted to tell you about and give you tips for the first time to improve the quality of your photo. We recommend experimenting more and after a while, you will know which basic camera settings are best for you. Take pictures and travel with travel-picture.ru.